Saturday, 13 October 2018

Meet: Pumpkin the Frog Prince

Welcome back everybody!  I had so much fun creating this fun Pumpkin Frog Prince for Sew a Softie Halloween Edition.


He is a sweet, sleepy, half frog, half pumpkin Prince.  He is straight from a fairy tale.


Easy to sew, lets get started.

You will need 2 squares of fabric.  Green and Orange
3 Pipe cleaners for the legs.
2 Eyes.
Black embroidery thread for the mouth.
Click here for the pattern.

Trace the pieces onto the felt.  There is a top and bottom part of the body pattern piece. The top should be orange and the bottom green.  You will need 6 of each and make sure to add the markings for the eye and leg placements.  I marked lightly with pencil, but you could also sew a small stitch with an contrasting color thread to show the marking.


Sew the top and bottom part of the body pattern together and then start sewing the 6 body pattern pieces together.  Make sure that the seams of the orange and green parts line neatly up.


Leave an opening between a 2 green parts to insert the eyes and the stuffing.


Stuff in the frog a little bit and then insert the eyes. Complete stuffing the frog and sew the opening close.


Lets make the green tuft at the top of the frog.  Cut short pieces of embroidery thread, tie them together and insert at the top seam of the frog.  Secure the tuft with small stitches to 'close' the opening at the top.  I couldn't decide which color to choose!


Fold the leg piece in half and sew from the toe to the top of the leg.  I choose not sew them with the right sides together, since it would've made turning them around very difficult.  Sew with small stitches to keep the edges neat.


Before you insert a pipe cleaner into each leg, bend the end over a little bit, so that it won't poke through the fabric. Insert them into the leg and cut shorter if needed.  Do this for all 4 legs.


Pin the legs to the body where you made the markings.  I bent the legs before sewing to make sure I was happy with their shape. Longer legs in the front and short ones at the back.  You will see that the feet has a specific shape.  Make sure that you have 2 right feet and 2 left feet.


After sewing the feet on, I made an extra holding stitch between the leg and the body, just to make sure that the legs are not too wobbly.


Using the black embroidery thread, sew a mouth onto the frog.  I used a long needle to go from one side to the other.  You can sew it onto the seam line, or make a more friendlier frog with a slight curve upwards.


I think all my frog needs now is a crown!


Please post and share your pictures with and remember to tag #sewasoftie.


Enjoy!

Saturday, 14 July 2018

Sew a Softie 2018

Hi there everyone!  Today is our turn to contribute to Sew a Softie 2018.  I've been playing around with the idea to create softies native to our country.  So here, hopefully the first of many, is the King of the Bushveld, the Lion.


The lion on our continent is the most majestic, dangerous, and absolute beautiful animal.  Lions are found in the Bushveld, a dry, Savannah part of our country.  The female lion is a lioness and babies are called cubs.

Lets get started on our softie.

Any brown felt will do.  A variety of colors will give your softie more depth.

Cut out the pattern pieces.  Stick them on hard cardboard - it is easier to work with and your pieces with last longer.

Click here for the pattern.

Cut 2 bodies, 9 mane hair pieces, 1 chest piece, 2 tail pieces.


Pin the mane hair pieces to one body part and pin the chest piece to the other body part.


Start sewing the chest piece to the first body part.  I used embroidery thread and running stitch.

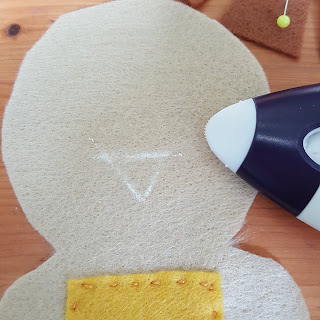
Mark a small triangle for the nose and fill in with embroidery thread.  I used a small piece of 'stitch and tear' at the back of where I sew the nose.  It makes the felt a bit stronger and makes sewing the nose easier as the fabric is sturdier.


I filled the nose in the longer stitches.


You can insert the eyes at this point if you are using safety eyes.   It depends what kind of eyes you are going to use.  I couldn't make up mind on which eyes to use.   At the end I used clear glass eyes, which I sewed in after stuffing the head.


Pin the 2 body pieces together and sew them together.  Leave a 'leave open' space between the legs.  I used running stitch, but you could use blanket stitch as well.


Sew feet detail in as you sew around the feet.  Remember to leave open between the legs.


Stuff the body with poly puffs.


Sew the tail pieces together, leaving an opening at the bottom and stuff lightly. Close the opening.  I sewed the tail on the body with a button.  (I like buttons).


Well done!  You have made a King of the Bushveld.

Remember to post you pictures and share with #sewasoftie


Sunday, 21 January 2018

Yarn Bowls

A while back I asked my friend from @creativemeza if she thinks I can make my own yarn bowls from polymer clay. I really wanted to make my own yarn bowls and was busy exploring the different ways I could achieve this. 

We then came up with the idea to ask another friend who makes ceramics, to pour us a couple of bowls. Isn't it wonderful to have such a great circle of friends!!! We worked on the greenware to cut out our shapes and sculpted sheep, bears and little dolls to add to our bowls.  

It was quite a long process and a lot of learning took place.  I learned that the clay is super soft and one has to work very carefully.  I learned which shapes works best on certain bowl shapes, how much glaze is needed and how firing at the wrong temperature can influence the colors.  


We starting cutting and sculpting on the greenware. We let it dry out completely before painting bowls. 


Next up was fine sanding and smoothing out some rough edges on the bowls.  This was the most challenging part.  They are extremely soft to work with and some didn't make it.  Then came the exciting part of painting the bowls.


After they survived the kiln, we painting them with glaze and fired them again.  


I was so excited to see the final product!  I am sure I will find each one of them a place and fill them with beautiful yarn!


What a wonderful journey this was and every step was exciting and fun!  Definitely something I will do again!


Related Posts Plugin for WordPress, Blogger...